Welcome to our guide on making a robotic arm with a servo motor. It’s a fun and educational DIY project. It’s great for beginners who want to learn about robotics and robotic arm design.
We’ll cover the key parts and materials you need. We’ll also talk about safety and how to make a robotic arm step by step.
Working on a servo motor DIY project is a great way to start with robotics. We aim to give you a clear guide to help you finish your DIY robotics projects.
In this guide, we’ll share the info and tips you need. Whether you’re a student, hobbyist, or just interested in DIY robotics, this guide is for you.
Understanding Servo Motors and Robotic Arms
To build a DIY robotic arm, knowing servo motors and robotic arms is key. A servo motor tutorial helps you learn how to use these motors. Even beginners can build a robotic arm with the right resources.
Servo motors are vital in robotic arm construction. They control the arm’s movement, enabling it to do various tasks. There are many types of servo motors for robotics, each with its own features and uses.
What is a Servo Motor?
A servo motor uses feedback to control its position, speed, and torque. It’s often used in robotic arms for precise movement control.
Basic Principles of Robotic Arms
Robotic arms are made to do tasks like picking and placing objects. They have joints controlled by servo motors. The key parts include servo motors, gearboxes, and control systems.
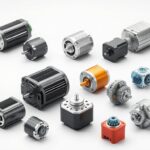
Types of Servo Motors for Robotics
Robotics uses different servo motors, like DC, AC, and stepper motors. Each has its own benefits and drawbacks. The right choice depends on the task at hand.
Understanding servo motors and robotic arms is the first step for beginners. With the right tools and knowledge, anyone can build a robotic arm. A servo motor tutorial and some practice can make you proficient in robotics.
| Types of Servo Motors | Advantages | Disadvantages |
|---|---|---|
| DC Servo Motors | High torque, low cost | Low speed, low efficiency |
| AC Servo Motors | High speed, high efficiency | High cost, complex control |
| Stepper Servo Motors | High precision, low cost | Low torque, low speed |
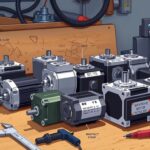
Essential Components and Materials Needed
To start building your robotic arm, you’ll need a few key parts. A robotic arm kit is a good starting point. It usually has the main parts like the servo motor, arm structure, and control board. When picking a kit, think about how complex you want it to be and the servo motor control you need.
Choosing the right servo motor for your robotic arm is important. Look at torque, speed, and power use. Digital and high-torque servo motors are popular choices. Also, pick a control board that can manage the servo motor and other parts.
- Servo motor
- Robotic arm kit
- Control board
- Power supply
- Wiring and connectors
When doing your DIY robotics project, always follow safety rules. Handle electronic parts carefully. With the right parts and materials, you’ll make a working robotic arm using servo motor control and a robotic arm kit.
Safety Precautions and Workspace Setup
When you’re building a robotic arm, keeping your servo motors safe is key. To do this right, you need to be careful and set up your space well. Make sure you have gloves, safety glasses, and work in a place with good air.
Having a tidy workspace helps a lot. Keep your tools and parts easy to find. This makes your work safer and more efficient.
Required Safety Equipment
- Insulated gloves
- Safety glasses
- Well-ventilated area
- Fire extinguisher
Organizing Your Workspace
To keep your workspace safe and efficient, follow these tips:
- Keep all tools and materials organized and within easy reach
- Use a clear and stable work surface
- Avoid clutter and tripping hazards

Handling Electronic Components
When you’re working with electronic parts like servo motors, be extra careful. This helps prevent damage or injury. Always handle parts gently, avoid static electricity, and follow the right installation steps.
| Component | Safety Precaution |
|---|---|
| Servo Motor | Handle with care, avoid static electricity |
| Electronic Circuits | Follow proper installation procedures, avoid short circuits |
How to Make Robotic Arm Using Servo Motor: Step-by-Step Guide
To make a robotic arm, start by putting together the basic parts. The servo motor is the heart of your robotic arm design. The servo motor DIY process involves attaching the motor to the arm and setting up the control system. This needs careful planning and doing to make a working and efficient robotic arm.
Here’s a step-by-step guide to help you get started:
- Attach the servo motor to the robotic arm structure, ensuring secure and stable connection.
- Construct the robotic arm, using materials such as aluminum or steel, and attach the servo motor to the arm.
- Install the control system, including the microcontroller and power supply, to control the servo motor and robotic arm movements.
When working on your how to make robotic arm project, think about the servo motor DIY details. Consider the motor’s torque and speed for the best performance. By following these steps and thinking about these key points, you can make a working and efficient robotic arm with a servo motor.
Always follow safety rules and use the right techniques when working with electronics and power tools. With patience and practice, you can make a robotic arm with a servo motor. You’ll enjoy the benefits of your robotic arm design project.
| Component | Description |
|---|---|
| Servo Motor | Core component of the robotic arm, responsible for movement and control. |
| Microcontroller | Controls the servo motor and robotic arm movements, using programming and sensors. |
| Power Supply | Provides power to the servo motor and microcontroller, ensuring stable and efficient operation. |
Designing the Arm Structure
When designing a robotic arm, many factors are important. A good design can greatly improve the success of DIY robotics projects. The base should be strong and stable to hold the arm and any loads.
Servo motor control is key for precise arm movement. The right servo motor depends on the arm’s weight, size, and precision needs.
- Joint mechanisms: The type of joint affects the arm’s range and flexibility.
- End effector options: The end effector interacts with the environment, suited for tasks like grasping.
- Materials: The choice of materials impacts the arm’s strength, weight, and durability.
By focusing on these factors and using servo motor control well, you can build a functional and efficient robotic arm. It will meet the needs of your DIY robotics projects.
| Component | Description |
|---|---|
| Base | Sturdy and stable platform to support the arm |
| Joint | Enables movement and flexibility in the arm |
| End Effector | Interacts with the environment and performs specific tasks |
Wiring and Circuit Assembly
Building a robotic arm starts with servo motor wiring. This step is key for the arm’s safe and efficient use. First, connect the servo motor to the control system. This is usually a microcontroller or a dedicated robotic arm controller.
In DIY electronics projects, proper wiring is vital. It prevents short circuits and damage to parts. A tidy wiring system also helps with troubleshooting and upkeep.
Here are some important tips for robotic arm electronics and servo motor wiring:
- Use high-quality wires and connectors for reliable connections.
- Stick to a consistent wiring color code for easier wiring.
- Keep wiring organized and secure to avoid damage or interference.

By following these tips and carefully wiring and assembling the circuit, you’ll make a reliable robotic arm. It can handle many tasks efficiently.
Programming Your Servo-Powered Robotic Arm
Now that your robotic arm is built, it’s time to make it move. This involves writing instructions for the servo motor programming. First, you need to know the basics of robotic arm control. You also need to learn how to use programming languages to talk to the servo motors.
Learning to write code for your robotic arm is key in DIY robotics programming. You can use languages like Python or Arduino. With these tools, you can make the arm do complex things and move it precisely.
Some important things to learn when programming your robotic arm include:
- Basic movement commands: These are the basic instructions that tell the arm to move, like going up or down.
- Motion sequences: These are sets of movements that the arm can do, making it possible to perform more complex tasks.
- Advanced programming options: These include things like using sensors and controlling the arm in real-time, which can make the arm more useful.
By getting good at servo motor programming and robotic arm control, you can make your DIY robotic arm do amazing things. You’ll be able to create cool projects that show off your skills in DIY robotics programming.
| Programming Language | Software | Description |
|---|---|---|
| Python | PySerial | A popular programming language used for robotic arm control and servo motor programming. |
| Arduino | Arduino IDE | A microcontroller platform commonly used for DIY robotics programming and robotic arm control. |
Testing and Calibration Techniques
After building and programming your robotic arm, it’s time to test and calibrate it. This step is key to making sure it works right. You’ll need to check its movement, how much it can lift, and how accurate it is. Also, calibrating the servo motors is important for its performance and life span.
First, test how well the arm moves. Make sure it can move all the way through its range without any issues. Then, check how much weight it can lift. You might need to adjust the servo positions to get the best results.
When testing, you might run into problems like jerky movements, not enough power, or not being in the right spot. For help with these issues, check out the DIY robotics troubleshooting guide. It has clear steps to find and fix common problems.
Here are some important things to keep in mind for testing and calibration:
- Movement range testing: Check if the arm can move smoothly through its range.
- Load capacity verification: Make sure the arm can lift the weight you need it to.
- Fine-tuning servo positions: Adjust the servos for the best performance.
| Test | Procedure | Expected Result |
|---|---|---|
| Movement Range Testing | Move the arm through its designated range | Smooth, consistent movement |
| Load Capacity Verification | Apply the intended weight to the arm | Stable, accurate movement |
| Fine-tuning Servo Positions | Adjust the servo positions for optimal performance | Improved accuracy and movement |
Conclusion: Bringing Your Robotic Arm to Life
Congratulations on finishing your robotic arm project! You’ve made a big step into the exciting world of DIY robotics. You should be proud of yourself for using your creativity and skills to make your robotic arm come to life.
Now that you’ve succeeded with your servo motor DIY project, think about growing your robotics knowledge. Look for online forums, go to maker events, or join a robotics club. There’s always more to learn and discover in the world of DIY robotics.
This robotic arm project is just the start. The skills you’ve learned can be used in many other projects. Keep your creativity going and explore all the possibilities in DIY robotics.